Cs382
Using the enVision Tabletop Groundwater Simulator
General Instructions
- Setup
- Teardown and cleaning
- Packing and travelling
Instructions for Demonstrations
- First one
- Second one
- etc.
Computational Groundwater Simulations
Fitz, Bryan and Mikio
Experiments
- Demonstrating porosity
- model water flow unconfined aquifier
- Illustrating groundwater flow in a confined aquifer
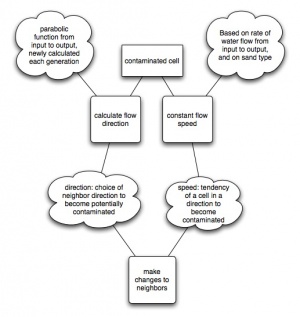
- We will use a cellular automata model where at the lowest level, a cell is either fresh water or contaminated. We see this problem split into two concepts - speed and direction.
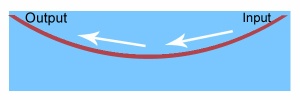
- Direction: The illustration to the right demonstrates our assumptions about how the water will move through the material. The simulation will calculate a new direction at each generation based on it's position relative to the known locations of water input and output.
- Speed: Remains constant throughout generations for a given run. The "speed" value represents a combination of speed of water flow and material porosity, and in terms of the simulation is the possibility that a a neighboring cell in the flow direction becomes contaminated.
- We will use a cellular automata model where at the lowest level, a cell is either fresh water or contaminated. We see this problem split into two concepts - speed and direction.
- Describing recharge, transition and discharge areas
- modeling behavior of water recharge, discharge in wells, lake, etc
Computational Tools
- C
- +Very fast
- +Libraries are available
- +Good distributed Libraries
- -Potentially difficult to use
- -no graphics libraries
- Netlogo
- +Fancy Graphics
- +Fun to use
- +Available examples/code
- -Slow
- -Small problem size
- -No Distributed processing
Peter and Mikio
Experiment
- Describing the model
- Describing the various parts of the Groundwater Simulator by attaching tags: Key words -- wells, artesian wells, lake, underground storage tank, septic tank, springs, vegetative layer, river/ocean, recharge area, discharge area, aquifers, confining layer, clay layers
- Illustrating and Calculating Porasity of different types of earth materials
- Determining how it is easy for ground water to move in different earth materials.
Computetional Tool
- NetLogo for computatinal experiment
Brad and Nate
Our goal is an incremental approach towards illustrating groundwater contamination in a confined aquifer. The confined aquifer, viewed between wells 1 and 8, offers an environment within the groundwater simulator with the fewest variables. The first 4 experiments are an effort to illustrate the behavior and underlying science that must be understood and demonstrated in the final experiment.
Experiments
- Diffusion
- Show diffusion without groundwater movement.
- Flow Rate
- Show the leading edge of groundwater contamination as a indicator of flow rate (related to section 5 and 13 in manual)
- Contaminant Plume Length
- Determine whether contaminant plume length is affected by flow rate for a given amount of dye
- Soil Density
- Use displacement method and measurements of aquifer component to determine the density of the soil. We can use this value in silico.
- Illustrate laminar flow in a confined aquifer (Activity 7-1)
- Show laminar flow between wells 1 and 8.
Computational Tools
- NetLogo
- + Visualization built in
- + Agent and cell based simulation structure built in
- - Possible limitation on world size / agent count in RAM
- - Possible run time slower than groundwater simulator at higher flow rates
- - Not parallel
- Python and MYMPI
- + Parallelizable
- + Faster than NetLogo in serial code ?
- + Visualization software exists
- TKInter - easy to install; seemingly easy to use
- - Visualization software must be integrated
- - MYMPI is untested
- Need to compile stuff.
Plume Tracking - Bryan and Brad
Setup
- physical simulator setup approximately 16 inches away and perpendicular to the line of sight of a web enabled camera.
- A script was used to capture output of the output of the camera from the server at a rate of one every two seconds. A faster rate may be possible, but the current script did not have time to get the image and rename it within a 1 second interval.
Procedure
- set pump flow rate at maximum and allow water table to equalize
- start image capture script
- inject a full pipette bulb into well number 1
- remove pipette before allowing bulb to reinflate
- allow simulator to run for approximately 5 minutes or until the majority of the dye in the system has been discharged
- stop image capture script
Raw Images
We did three complete runs, each with a different dye colors. We used blue, purple and green because we thought they would give the most contrast between the dye and sand.
Modified Images
Each image was adjusted to fix lens distortion, cropped and had its colors inverted for higher contrast. A ruler was added and the webcam's timestamp was preserved. The image processing was done via batch jobs in Photoshop.
- run1_mod.tgz (inverted blue)
- run2_mod.tgz (inverted purple)
- run3_mod.tgz (inverted green)
Movies
The movies were created with Quicktime Pro's "open image sequence". QT does not appear to have the capability to have custom framerates outside of their standard choices. This means that the actual simulation and the movie of the simulation run at different speeds.
- run1.mov (inverted blue)
- Actual run time - 5:18 (1.59 seconds/frame average)
- Movie run time - 6:40 (2 seconds/frame )
- Frames - 200
- run1.mov (inverted purple)
- Actual run time - 4:40 (2.12 seconds/frame average)
- Movie run time - 4:24 (2 seconds/frame)
- Frames - 132
- run1.mov (inverted green)
- Actual run time - 5:24 (2.16 seconds/frame average)
- Movie run time - 5:00 (2 seconds/frame)
- Frames - 150

