Difference between revisions of "Sysadmin"

From Earlham CS Department
Jump to navigation Jump to search
(Switches)
m (Machines and Brief Descriptions of Services)
Line 1: Line 1:
__NOTOC__
+
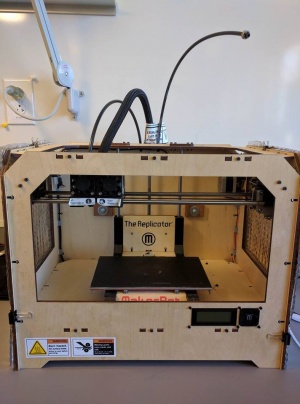
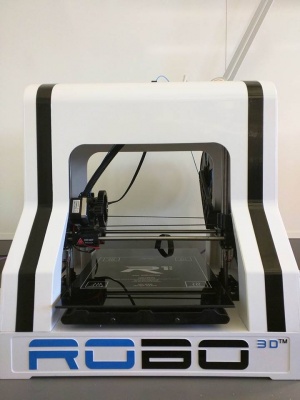
== '''Introducing our 3D printers:''' ==
  
= Machines and Brief Descriptions of Services =
 
== CS Machines ==
 
{| style="float:left; margin-right:2px;"
 
| style="height:40px; width:150px; text-align:center; background-color:#ADDFFF; border-left:solid 5px #ADDFFF; border-top:solid 5px #ADDFFF; border-bottom:solid 1px white; border-right:solid 5px      #ADDFFF; font-size:120%;" | HOME <br> (vm0)
 
|-
 
| style="height:135px; width:150px; background-color:#ADDFFF; border-left:solid 5px #ADDFFF; border-bottom:solid 5px #ADDFFF; border-right:solid 5px #ADDFFF;" | Users <br> SSH <br> NFS
 
|}
 
  
{| style="float:left; margin-right:2px;"
+
{|style="margin: 0 auto;"
| style="height:40px; width:150px; text-align:center; background-color:#54C571; border-left:solid 5px #54C571; border-top:solid 5px #54C571; border-bottom:solid 1px white; border-right:solid 5px #54C571; font-size:120%;" | NET <br> (vm1)
+
|[[File:MakerBot.jpg|thumb|300px|MakerBot]]
|-
+
|[[File:Robo_3D.jpg|thumb|300px|Robo 3D]]
| style="height:135px; width:150px; background-color:#54C571; border-left:solid 5px #54C571; border-bottom:solid 5px #54C571; border-right:solid 5px #54C571;" | LDAP server <br> [[Sysadmin:DNS & DHCP | DNS]] <br> [[Sysadmin:DNS & DHCP | DHCP]]
+
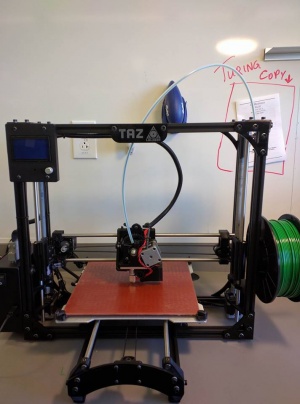
|[[File:Taz_LulzBot.jpg|thumb|300px|Taz Lulzbot]]
|}


{| style="float:left; margin-right:2px;"
 
| style="height:40px; width:150px; text-align:center; background-color:#E77471; border-left:solid 5px #E77471; border-top:solid 5px #E77471; border-bottom:solid 1px white; border-right:solid 5px #E77471; font-size:120%;" | WEB <br> (vm2)
 
|-
 
| style="height:135px; width:150px; background-color:#E77471; border-left:solid 5px #E77471; border-bottom:solid 5px #E77471; border-right:solid 5px #E77471;" | Mailman <br> [[Sysadmin:Mail Stack | Mail Stack]]<br> Apache2 <br> PostgresQL <br> MySQL <br> Wiki
 
|}


{| style="float:left; margin-right:2px;"
 
| style="height:40px; width:150px; text-align:center; background-color:#C38EC7; border-left:solid 5px #C38EC7; border-top:solid 5px #C38EC7; border-bottom:solid 1px white; border-right:solid 5px #C38EC7; font-size:120%;" | TOOLS <br> (vm3)
 
|-
 
| style="height:135px; width:150px; background-color:#C38EC7; border-left:solid 5px #C38EC7; border-bottom:solid 5px #C38EC7; border-right:solid 5px #C38EC7;" | [[Sysadmin:SageNB Server | SageNB Server]] <br> [[Sysadmin:Jupyterhub Notebook Server | Jupyterhub Server]] <br> [[Sysadmin:Software Modules | Software Modules]] <br> NginX
 
|}


{| style="float:left; margin-right:2px;"
 
| style="height:55px; width:150px; text-align:center; background-color:#E3A869; border-left:solid 5px #E3A869; border-top:solid 5px #E3A869; border-bottom:solid 1px white; border-right:solid 5px #E3A869; font-size:120%;" | BABBAGE
 
|-
 
| style="height:135px; width:150px; background-color: #E3A869; border-left:solid 5px #E3A869; border-bottom:solid 5px #E3A869; border-right:solid 5px #E3A869;" | [[Sysadmin:Firewall | Firewall]]
 
|}


{|
 
| style="height:55px; width:150px; text-align:center; background-color:#EEDC82; border-left:solid 5px #EEDC82; border-top:solid 5px #EEDC82; border-bottom:solid 1px white; border-right:solid 5px #EEDC82; font-size:120%;" | [[Sysadmin:Servers:Proto | PROTO]]
 
|-
 
| style="height:135px; width:150px; background-color: #EEDC82; border-left:solid 5px #EEDC82; border-bottom:solid 5px #EEDC82; border-right:solid 5px #EEDC82;" | Weather Monitoring <br> GPS/NTP <br> Energy Monitoring
 
|}


{| style="float:left; margin-right:2px;"
 
| style="height:40px; width:150px; text-align:center; background-color:#54C571; border-left:solid 5px #54C571; border-top:solid 5px #54C571; border-bottom:solid 1px white; border-right:solid 5px      #54C571; font-size:120%;" | CONTROL
 
|-
 
| style="height:135px; width:150px; background-color:#54C571; border-left:solid 5px #54C571; border-bottom:solid 5px #54C571; border-right:solid 5px #54C571;" | Users <br> SSH
 
|}


{| style="float:left; margin-right:2px;"
 
| style="height:40px; width:150px; text-align:center; background-color:#E77471; border-left:solid 5px #E77471; border-top:solid 5px #E77471; border-bottom:solid 1px white; border-right:solid 5px      #E77471; font-size:120%;" | SHINKEN
 
|-
 
| style="height:135px; width:150px; background-color:#E77471; border-left:solid 5px #E77471; border-bottom:solid 5px #E77471; border-right:solid 5px #E77471;" | Users <br> SSH <br> Add machines
 
|}


{| style="float:left; margin-right:2px;"
 
| style="height:40px; width:150px; text-align:center; background-color:#C38EC7; border-left:solid 5px #C38EC7; border-top:solid 5px #C38EC7; border-bottom:solid 1px white; border-right:solid 5px      #C38EC7; font-size:120%;" |MURPHY
 
|-
 
| style="height:135px; width:150px; background-color:#C38EC7; border-left:solid 5px #C38EC7; border-bottom:solid 5px #C38EC7; border-right:solid 5px #C38EC7;" | Users <br> SSH
 
|}


== Cluster Machines ==


{| style="float:left; margin-right:2px;"
 
| style="height:55px; width:150px; text-align:center; background-color:#0099cc; border-left:solid 5px #0099cc; border-top:solid 5px #0099cc; border-bottom:solid 1px white; border-right:solid 5px      #0099cc; font-size:120%;" | HOPPER
 
|-
 
| style="height:200px; width:150px; background-color:#0099cc; border-left:solid 5px #0099cc; border-bottom:solid 5px #0099cc; border-right:solid 5px #0099cc;" | Users <br> SSH <br> NFS <br> [[Sysadmin:Software Modules | Software Modules]] <br> PostgresQL <br> Wiki <br> Apache2 <br> [[Sysadmin:DNS & DHCP | DNS]] <br> [[Sysadmin:DNS & DHCP | DHCP]]
 
|}


{| style="float:left; margin-right:2px;"
 
| style="height:55px; width:150px; text-align:center; background-color:#ffdb4d; border-left:solid 5px #ffdb4d; border-top:solid 5px #ffdb4d; border-bottom:solid 1px white; border-right:solid 5px #ffdb4d; font-size:120%;" | DALI
 
|-
 
| style="height:200px; width:150px; background-color:#ffdb4d; border-left:solid 5px #ffdb4d; border-bottom:solid 5px #ffdb4d; border-right:solid 5px #ffdb4d;" | [[Sysadmin:Gitlab | Gitlab]] <br> Backups <br> NginX
 
 
|}
 
|}
  
{| style="float:left; margin-right:2px;"
+
== '''Printing instructions:''' ==
| style="height:55px; width:150px; text-align:center; background-color:#ff4d94; border-left:solid 5px #ff4d94; border-top:solid 5px #ff4d94; border-bottom:solid 1px white; border-right:solid 5px #ff4d94; font-size:120%;" | AL-SALAM
 
|-
 
| style="height:200px; width:150px; background-color:#ff4d94; border-left:solid 5px #ff4d94; border-bottom:solid 5px #ff4d94; border-right:solid 5px #ff4d94;" | WebMO <br> [[Sysadmin:Software Modules | Software Modules]] <br> Apache2
 
|}
 
  
{| style="float:left; margin-right:2px;"
+
=== '''Desiging your own 3D model:''' ===
| style="height:55px; width:150px; text-align:center; background-color:#39ad39; border-left:solid 5px #39ad39; border-top:solid 5px #39ad39; border-bottom:solid 1px white; border-right:solid 5px #39ad39; font-size:120%;" | LAYOUT
 
|-
 
| style="height:200px; width:150px; background-color:#39ad39; border-left:solid 5px #39ad39; border-bottom:solid 5px #39ad39; border-right:solid 5px #39ad39;" | [[Sysadmin:Jupyterhub Notebook Server | Jupyterhub Server]] <br> [[Sysadmin:Software Modules | Software Modules]] <br> NginX <br> Apache2 <br> WebMO
 
|}
 
  
{| style="float:left; margin-right:2px;"
+
Software: OpenSCAD
| style="height:55px; width:150px; text-align:center; background-color:#0099cc; border-left:solid 5px #0099cc; border-top:solid 5px #0099cc; border-bottom:solid 1px white; border-right:solid 5px #0099cc; font-size:120%;" | BRONTE
 
|-
 
| style="height:200px; width:150px; background-color:#0099cc; border-left:solid 5px #0099cc; border-bottom:solid 5px #0099cc; border-right:solid 5px #0099cc;" |  [[Sysadmin:Software Modules | Software Modules]]
 
|}
 
  
{| style="float:left; margin-right:2px;"
+
Cheat Sheet: http://www.openscad.org/cheatsheet/index.html
| style="height:55px; width:150px; text-align:center; background-color:#0099cc; border-left:solid 5px #0099cc; border-top:solid 5px #0099cc; border-bottom:solid 1px white; border-right:solid 5px #0099cc; font-size:120%;" | POLLOCK
 
|-
 
| style="height:200px; width:150px; background-color:#0099cc; border-left:solid 5px #0099cc; border-bottom:solid 5px #0099cc; border-right:solid 5px #0099cc;" |  [[Sysadmin:Software Modules | Software Modules]] <br> WebMO <br> NginX
 
|}


{| style="float:left; margin-right:2px;"
 
| style="height:55px; width:150px; text-align:center; background-color:#ffdb4d; border-left:solid 5px #ffdb4d; border-top:solid 5px #ffdb4d; border-bottom:solid 1px white; border-right:solid 5px #ffdb4d; font-size:120%;" | KAHLO
 
|-
 
| style="height:200px; width:150px; background-color:#ffdb4d; border-left:solid 5px #ffdb4d; border-bottom:solid 5px #ffdb4d; border-right:solid 5px #ffdb4d;" | Backups <br> NginX
 
|}


{| style="float:left; margin-right:2px;"
 
| style="height:55px; width:150px; text-align:center; background-color:#0099cc; border-left:solid 5px #0099cc; border-top:solid 5px #0099cc; border-bottom:solid 1px white; border-right:solid 5px #0099cc; font-size:120%;" | BIGFE
 
|-
 
| style="height:200px; width:150px; background-color:#0099cc; border-left:solid 5px #0099cc; border-bottom:solid 5px #0099cc; border-right:solid 5px #0099cc;" |  [[Sysadmin:Software Modules | Software Modules]]
 
|}


{| style="float:left; margin-right:2px;"
 
| style="height:55px; width:150px; text-align:center; background-color:#0099cc; border-left:solid 5px #0099cc; border-top:solid 5px #0099cc; border-bottom:solid 1px white; border-right:solid 5px #0099cc; font-size:120%;" | T-VOC
 
|-
 
| style="height:200px; width:150px; background-color:#0099cc; border-left:solid 5px #0099cc; border-bottom:solid 5px #0099cc; border-right:solid 5px #0099cc;" |  [[Sysadmin:Software Modules | Software Modules]]
 
|}


{| style="float:left; margin-right:2px;"
 
| style="height:55px; width:150px; text-align:center; background-color:#0099cc; border-left:solid 5px #0099cc; border-top:solid 5px #0099cc; border-bottom:solid 1px white; border-right:solid 5px #0099cc; font-size:120%;" | ELWOOD
 
|-
 
| style="height:200px; width:150px; background-color:#0099cc; border-left:solid 5px #0099cc; border-bottom:solid 5px #0099cc; border-right:solid 5px #0099cc;" |  [[Sysadmin:Software Modules | Software Modules]]
 
|}
 
  
 +
After creating your own 3D model follow this steps:
 +
* Render and compile your code by pressing F6
 +
* Export the design as .stl
 +
* If the file is in your own computer, move the file(name.stl) to the Mac found in Turing lab(CST 222)
  
 +
=== '''Overhang / Supports''' ===
  
 +
Software: Meshmixer
  
<br><br><br><br><br><br><br><br><br><br><br><br><br><br><br><br><br><br><br><br><br><br><br><br><br><br><br><br><br>
+
Once you import a pre-existing model:
 +
* Use the align tool under the Edit tab to place model on bed
 +
* Use the overhang tool under the Analysis tab to generate supports for the model
 +
* Export as " *.stl " when finished
  
 +
=== '''Instructions on how to use the 3D printers:''' ===
  
 +
==== '''Robo R1+ 3D Printer''' ====
  
 +
Software for the printer: MatterControl
  
 +
Printing from an SD card:
 +
*Insert a microSD card into the Mac and get rid of any files in it.
 +
*Open MatterControl and drag your .stl file into the QUEUE section of the application.
 +
*On the top-left section, click on “Select Printer.” Select “Robo 3D TM Turing” in the window that pops out.
 +
*Towards the bottom of the QUEUE section, you will find a “Queue” button. Click on it to get a list.
 +
*On the list, below GCode, select “Export to Folder or SD Card.” Click on the microSD card under “Devices” in the side panel and click on “Export”
 +
*Now, in Finder, browse to the microSD card and rename the file you just exported as “auto0.g” (auto zero dot g). Choose “Use.g” if a prompt appears.
 +
*Then, safely remove the microSD card from the Mac and insert it into the Robo 3D printer.
 +
*Prep the build plate using one the following:
 +
**Glue Stick
 +
**Vinyl Sheeting
 +
**Hairspray
 +
:Apply whichever product on the surface of the build plate enough to cover the surface you will be printing on.                                                             
 +
*Turn the printer on. Your print will start after about 5 minutes.
 +
*After the print is over, wait for the temperature to cool down and carefully remove the 3D printed object from the build plate.
 +
*Clean the build plate.
  
 +
Printing from the computer:
 +
*Open MatterControl and drag your .stl file into the QUEUE section of the application.
 +
*On the top-left section, click on “Select Printer.” Select “Robo 3D TM Turing” in the window that pops out.
 +
*Under "Settings" ensure that the correct material is selected.
 +
*Under "Controls" an offset of 0.9 typically shows the best results.
 +
*Pre-heat the extruder and bed on the same page.
 +
*Alternatively, near the top center of the screen, an extruder temperature and a bed temperature will be shown, mouse over and click "pre-heat" for both.
 +
*Prep the build plate using one the following:
 +
**Glue Stick
 +
**Vinyl Sheeting
 +
**Hairspray
 +
*Click print once the printer has heated up.
 +
*After the print is over, wait for the temperature to cool down and carefully remove the 3D printed object from the build plate.
 +
*Clean the build plate.
  
 +
==== '''Taz Lulzbot 3D Printer''' ====
 +
Software for the printer: Cura
  
 +
Steps to follow in order to print:
 +
*Insert a microSD card into the Mac.
 +
*Open Cura and press “Load Model” to upload the stl file you want to print.
 +
*Right click “Control” and select the “Save gcode” and then choose the SDcard under the “Devices” panel.
 +
*Make sure the Taz 3D Printer is turned on.
 +
*Safely eject the sdCard from the Mac and insert it into Taz Printer (on left side of the LCD screen)
 +
**Make sure the SD card has the pins facing towards you when insert it
 +
*Back on the LCD screen, rotate the knob counter-clockwise to decrease the print speed to ~50%
 +
*Press the knob, scroll down by rotating the knob clockwise and select “Temperature”.
 +
*Select “Custom Temp” and set the "Nozzle" to 240 and "Bed" to 64
 +
*After a few seconds, the LCD will display the info screen again and the printer will start heating up. Wait until the temperatures reach 240C and 64C.
 +
*In the info screen, press the knob again. Scroll down and select “Print from SD” Select your file and it will start printing right away.
 +
*Once the printing has finished, wait for the bed to cool down and carefully remove the 3D printed object.
  
 +
==== '''MakerBot 3D Printer''' ====
 +
Software for the printer: ReplicatorG
  
 
+
Steps to follow in order to print:
 
+
*Insert a microSD card into the Mac.
 
+
*Open ReplicatorG, drag and drop your stl file into application screen.  
== Switches ==
+
*Adjust your model if you need to.
 
+
*Select “Generate GCode” on the bottom right.
 
+
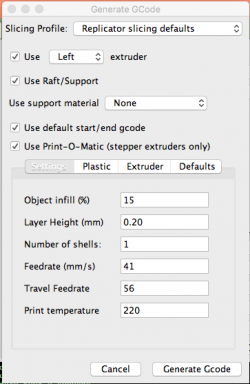
*Make sure the values are set as shown in the image below and then select “Generate GCode”
 
+
:[[File:Replicator_values.png|thumb|250px|center]]
{| style="float:left; margin-right:2px;"
+
*If prompted with an “Acceleration Warning” select “OK”
| style="height:55px; width:175px; text-align:center; background-color:#0099cc; border-left:solid 5px #0099cc; border-top:solid 5px #0099cc; border-bottom:solid 1px white; border-right:solid 5px      #0099cc; font-size:120%;" | SG538SF02J
+
*Wait until it generates the gcode.  
|-
+
*After the file is generated go to the gcode tab and modify the numbers on the lines M104 should be 230 and M109 should be 128, i.e.:
| style="height:200px; width:175px; background-color:#0099cc; border-left:solid 5px #0099cc; border-bottom:solid 5px #0099cc; border-right:solid 5px #0099cc; font-size:80%;" |
+
:M104 S230 T1 (set extruder temperature) M109 S128 T1 (set HBP  temperature)
*Model: HP Procurve 3400cl
+
:Make sure to save it by pressing “Command + S”.
*Ports: 24
+
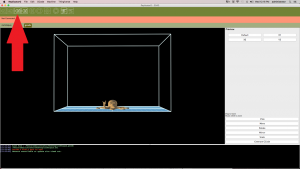
*Select “Build to file using SD Card” as shown in the image below. Select the microSD card and make sure to save it as “.x3g” format.
*Backplane bandwidth:
+
:[[File:Build_from_sd.png|thumb|300px|center]]
**88 Gbps
+
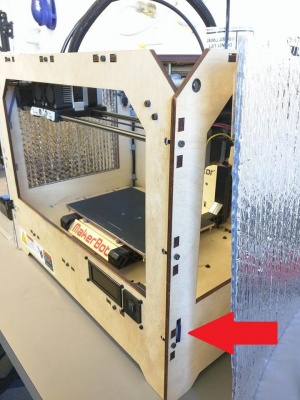
*Wait until it is done building and then safely eject the sdCard from the Mac and insert it into the MakerBot. Note: You can find the sdCard slot as shown in the image below:
**64 million pps
+
:[[File:MakerBot-slot.jpg|thumb|300px|center]]
*Memory:
+
*Turn on the printer.  
**2MB packet buffer
+
*Select “Build from SD” and then using the arrows scroll down to your file.
**16 MB dual flash
+
*The printer will start heating up and once it finishes heating up, it will start printing.
**128 MB SDRAM
+
*Once the printing has finished, wait for the bed to cool down and carefully remove the 3D printed object.
*Cut-through switching: No
 
*Unused as of May 12, 2017
 
|}


{| style="float:left; margin-right:2px;"
 
| style="height:55px; width:175px; text-align:center; background-color:#ffdb4d; border-left:solid 5px #ffdb4d; border-top:solid 5px #ffdb4d; border-bottom:solid 1px white; border-right:solid 5px #ffdb4d; font-size:120%;" | CN63FP762S
 
|-
 
| style="height:200px; width:175px; background-color:#ffdb4d; border-left:solid 5px #ffdb4d; border-bottom:solid 5px #ffdb4d; border-right:solid 5px #ffdb4d;font-size:80%;" |
 
*Model: HP 2530-24G
 
*Ports: 24
 
*Switching Capacity:
 
**56 Gbps
 
**41.6 million pps
 
*Memory:
 
**1.5 MB packet buffer
 
**256 MB  flash
 
**128 MB DDR3 DIMM
 
*Cut-through switching: No
 
*Connected to Al-Salam as of May 12, 2017
 
|}


{| style="float:left; margin-right:2px;"
 
| style="height:55px; width:175px; text-align:center; background-color:#ff4d94; border-left:solid 5px #ff4d94; border-top:solid 5px #ff4d94; border-bottom:solid 1px white; border-right:solid 5px #ff4d94; font-size:120%;" | SG525SG025
 
|-
 
| style="height:200px; width:175px; background-color:#ff4d94; border-left:solid 5px #ff4d94; border-bottom:solid 5px #ff4d94; border-right:solid 5px #ff4d94;font-size:80%;" |
 
*Model: HP Procurve 3400cl
 
*Ports: 24
 
*Backplane bandwidth:
 
**88 Gbps
 
**64 million pps
 
*Memory:
 
**2MB packet buffer
 
**16 MB dual flash
 
**128 MB SDRAM
 
*Cut-through switching: No
 
*Connected to layout and whedon as of May 12, 2017
 
|}


{| style="float:left; margin-right:2px;"
 
| style="height:55px; width:175px; text-align:center; background-color:#39ad39; border-left:solid 5px #39ad39; border-top:solid 5px #39ad39; border-bottom:solid 1px white; border-right:solid 5px #39ad39; font-size:120%;" | Netgear JGS524
 
|-
 
| style="height:200px; width:175px; background-color:#39ad39; border-left:solid 5px #39ad39; border-bottom:solid 5px #39ad39; border-right:solid 5px #39ad39;font-size:80%;" |
 
*Current cluster head-node
 
*Unmanaged (no console/configuration)
 
*Ports: 24
 
*Switching bandwidth:
 
**48 Gbps
 
**1.5 million pps
 
*Memory:
 
**2MB packet buffer
 
*Cut-through switching: No
 
*Connected to Al-Salam, Hopper, Pollock, Nagios, Dali, Kahlo, Bronte as of May 12, 2017
 
|}


{| style="float:left; margin-right:2px;"
 
| style="height:55px; width:175px; text-align:center; background-color:#E77471; border-left:solid 5px #E77471; border-top:solid 5px #E77471; border-bottom:solid 1px white; border-right:solid 5px #E77471; font-size:120%;" | cs-main
 
|-
 
| style="height:200px; width:175px; background-color:#E77471; border-left:solid 5px #E77471; border-bottom:solid 5px #E77471; border-right:solid 5px #E77471;font-size:80%;" |
 
*Model: HP 5920AF-24XG
 
*Ports: 24
 
*Backplane bandwidth:
 
**480 Gbps
 
**367 million pps
 
*Memory:
 
**3.6 GB packet buffer
 
**256 MB dual flash
 
**2 GB SDRAM
 
*Cut-through switching: Yes
 
*IP Address: 159.28.31.66
 
*Connected to layout, kahlo, and dali as of May 12, 2017
 
|}


{| style="float:left; margin-right:2px;"
 
| style="height:55px; width:175px; text-align:center; background-color:#ADDFFF; border-left:solid 5px #ADDFFF; border-top:solid 5px #ADDFFF; border-bottom:solid 1px white; border-right:solid 5px #ADDFFF; font-size:120%;" | 5500denniscs-sw1
 
|-
 
| style="height:200px; width:175px; background-color:#ADDFFF; border-left:solid 5px #ADDFFF; border-bottom:solid 5px #ADDFFF; border-right:solid 5px #ADDFFF;font-size:80%;" |
 
*Model: HP 5500 JG542A
 
*Ports: 24
 
*Backplane bandwidth:
 
**224 Gbps
 
**166.6 million pps
 
*Memory:  
 
**6 MB packet buffer
 
**512 MB dual flash
 
**1 GB SDRAM
 
*Cut-through switching: No
 
*IP Address: 159.28.31.67
 
*Connected to Babbage, Control, Nagios, and the cluster's netgear switch (via port 14) as of May 12, 2017
 
|}


<br><br><br><br><br><br><br><br><br><br><br><br><br><br><br><br><br>
 
<br><br><br><br><br><br>


= Systems Administration Documentation =
 
For old documentation, see: [[Sysadmin:Old | Old Wiki Information]]


{|
 
|- valign:"top"
 
|
 
<div style="border:10px solid #E0EAF8; padding:5px; width:230px; height:500px">
 
<div style="background-color:#CEDEF4; padding:5px;">


=== Admin Tasks ===
 
</div>
 
* [[Sysadmin:Nagios | Nagios Monitoring ]]
 
* [[Sysadmin:Shinken | Shinken Monitoring ]]
 
* [[Sysadmin:Upgrading SSL Certificate | Upgrading SSL Certificates ]]
 
* [[Sysadmin:User Management | User Management]]
 
* [[Newmodules | Installing software under modules ]]
 
* [[Sysadmin:Backup|Backup]]
 
* [[Sysadmin:Contacting all users|Contacting all users]]
 
* [[Sysadmin:New Sysadmins | Welcoming a new sysadmin to the fold]]
 
* [[Sysadmin:AddComputer|Add a computer]]
 
* [[Sysadmin:Setting up Lovelace Lab Machines | Setting up Lovelace Lab Machines]]
 
* [[Reset password]]


<!-- This has to stay as part of the formatting -->
 
</div>
 
| style="float:left;" |
 
|
 
<div style="border:10px solid #FFDFFF; padding:5px; width:230px; height:500px;">
 
<div style="background-color:#FFCEFF; padding:5px;">


=== Services ===
 
</div>
 
* [[Sysadmin:Services:Apache2|Apache2]]
 
* [[Sysadmin:Services:Databases|Databases]]
 
* [[Sysadmin:DNS & DHCP|DNS and DHCP]]
 
* [[Sysadmin:Services:Virtualization | Virtualization]]
 
* [[Sysadmin:Services:XenServerSetup | Xen Server]]


<!-- This has to stay as part of the formatting -->
 
</div>
 
| style="float:left;" |
 
|
 
<div style="border:10px solid #F0DDD5; padding:5px; width:230px; height:500px;">
 
<div style="background-color:#E4C0B1; padding:5px;">


=== Miscellaneous ===
 
</div>
 
* [[ShutdownProcedure| Shutdown and Boot up]]
 
* [[SysadminContactInfo| Contact Information]]
 
* [[Sysadmin:ImportantInfo:PhoneNumbers| Phone Numbers]]
 
* [[Sysadmin:ImportantInfo:AuthenticationInfo| Authentication Information]]
 
* [[Sysadmin:ImportantInfo:UPS| UPS]]
 
* [[Sysadmin:ImportantInfo:SSLcerts| Generating SSL Certificates]]
 
* [[Sysadmin:Power draws| Power draws]]
 
* [[Sysadmin:ImportantInfo:SunHardware|Working with Sun Hardware]]
 
* [[Sysadmin:Passwords]]
 
* Patching
 
** [[LinuxKernelPatching|Linux Kernel Patching]]
 
* [[Sysadmin:SerialConsoleCableEnds|Cable Ends]]
 
* [[Sysadmin:VirtualizationComparison|NEW Virtualization Comparison]]


<!-- This has to stay as part of the formatting -->
 
</div>
 
| style="float:left;" |
 
|
 
<div style="border:10px solid #D6F8DE; padding:5px; width:230px; height:500px;">
 
<div style="background-color:#BDF4CB; padding:5px;">


=== Networking ===
 
</div>
 
* [[Sysadmin:Networking:NetworkLayout|Network Layout (as of 08/2006)]]
 
* [[Sysadmin:Networking:D224 cable plant|D224 cable plant]]
 
* [[Sysadmin:Networking:Fiber plans|Fiber plans]]
 
* [[Sysadmin:Networking:Switches|Switches]]
 
* [[Sysadmin:Networking:Rack notes|Rack notes]]
 
* [[Sysadmin:Networking:Public|Public Network]]
 
* [[Sysadmin:Networking:NetworkTopo|Old Network Topo Figures]]
 
* [[Sysadmin:Networking:NetworkDiagram|Network layout (May 2007)]]
 
* [[Sysadmin:Networking:Alternate Network Path|Alt Network path]]
 
* [[Sysadmin:UPS Setup]]


<!-- This has to stay as part of the formatting -->
 
</div>
 
|}


== Current Projects (updated 2017-04-27) ==
 
=== TODO ===
 
* Layout infiniband subnet manager
 
* Layout disk swap, new lo0
 
* HP Al-Salam switch enable jumboframes


== Ongoing Projects (Spring 2017) ==
 
=== TODO ===
 
* EMAILING ALL THE USERS https://wiki.cs.earlham.edu/index.php/Sysadmin:Old:Contacting_All_Users
 
* SHUTDOWN SCHEDULED FOR SUNDAY (APRIL 16)
 
** Check/update instructions - one version is at https://wiki.cs.earlham.edu/index.php/Sysadmin:ImportantInfo:PowerFailure, there are others too
 
** Notify users
 
* Fix certs for gitlab, etc.
 
* Secure 1-2 admins for the summer
 
* Prep layout for May-June usage
 
* Practice shutdown-startup procedure (with Michael)
 
* Nsswitch consistency across all machines
 
* Document tools: startup / shutdown - Charlie
 
* Use Sysadmin namespace for all our pages - All
 
** Testing usefulness of documentation - Dave
 
* Al Salam: configure switch, re-rack. - Vitalii
 
** HP switch should be reset and tested.
 
* LDAP cleanup of system users / old groups - James
 
* Layout - Nirdesh
 
** Lo0 RAID (mdadm)
 
** 10GB from Dali to lo0 (adding rules on compute node routing tables as a possible fix)
 
** BIOS reset
 
* 10Gb, perfsonar, ...
 
* Monitoring: (Ganglia, Shinken)
 
** Getting consistency among all the machines(check_nrpe regularly stops working).
 
* Whedon: configured and available
 
* Change passwords (on everything). Postgres, shenken, ...
 
* Webcam on office whiteboard (new office location?)
 
* Learn virtual machine architecture and modules - Dave
 
** Document in a format for future admin training?
 
** Find existing introduction material
 
* Mirror ''control'' for testing, swapping, etc.


=== DONE (19 Jan 2017) ===
 
* Examine extra "layout" node. - Adam
 
** Differences are: Single PSU, Single GPGPU, No VGA.
 
** It has Infiniband and 10GB cards installed.
 
* Networking - Adam, Charlie
 
** IP over Infiniband working on layout
 
*** Resolved by resetting IB switch configuration: <code>ibwarn: [3349] mad_rpc_rmpp: _do_madrpc failed; dport (Lid 1)</code>


=== FUTURE ===
 
* Centralized password database / manager / location


== Current Projects (updated 13 Oct 16) ==
 
* '''Groups and LDAP and sudo - James'''
 
* <s>Amber - James</s>
 
* <s>Edward's setup - Vitalli</s>
 
* <s>WebDev access - Nirdesh<s>
 
* Puppet - James and Vitalii
 
* '''Bacula - Nirdesh'''
 
* SSL certificate upgrade and documentation - Kristin
 
* <s>Listserv merging with archives preserved - Nirdesh </s>
 
* '''Ganglia - Bret'''
 
* '''Shenken - Vitalii'''
 
** latency, UPS
 
* New Layout node - ? and ?
 
* Provision Sappho (compute) - after Puppet
 
* Provision Kahlo (storage) -
 
** replace broken drive
 
* I2 setup
 
** DTN, storage nodes, head nodes, ports in CST
 
* [[Sysadmin:WhedonProvisioning|Provision Whedon]] (compute) - after Puppet
 
* '''Shutdown and startup test - scheduled for Sunday 27 November'''
 
* Disk cleaning - Charlie
 
* <s>Password changing in the CS and cluster domains - Vitalii and James</s>
 
* Proto setup and maintenance with HIP/Green Science
 

Revision as of 13:52, 6 June 2017

Introducing our 3D printers:

MakerBot
Robo 3D
Taz Lulzbot

Printing instructions:

Desiging your own 3D model:

Software: OpenSCAD

Cheat Sheet: http://www.openscad.org/cheatsheet/index.html

After creating your own 3D model follow this steps:

  • Render and compile your code by pressing F6
  • Export the design as .stl
  • If the file is in your own computer, move the file(name.stl) to the Mac found in Turing lab(CST 222)

Overhang / Supports

Software: Meshmixer

Once you import a pre-existing model:

  • Use the align tool under the Edit tab to place model on bed
  • Use the overhang tool under the Analysis tab to generate supports for the model
  • Export as " *.stl " when finished

Instructions on how to use the 3D printers:

Robo R1+ 3D Printer

Software for the printer: MatterControl

Printing from an SD card:

  • Insert a microSD card into the Mac and get rid of any files in it.
  • Open MatterControl and drag your .stl file into the QUEUE section of the application.
  • On the top-left section, click on “Select Printer.” Select “Robo 3D TM Turing” in the window that pops out.
  • Towards the bottom of the QUEUE section, you will find a “Queue” button. Click on it to get a list.
  • On the list, below GCode, select “Export to Folder or SD Card.” Click on the microSD card under “Devices” in the side panel and click on “Export”
  • Now, in Finder, browse to the microSD card and rename the file you just exported as “auto0.g” (auto zero dot g). Choose “Use.g” if a prompt appears.
  • Then, safely remove the microSD card from the Mac and insert it into the Robo 3D printer.
  • Prep the build plate using one the following:
    • Glue Stick
    • Vinyl Sheeting
    • Hairspray
Apply whichever product on the surface of the build plate enough to cover the surface you will be printing on.
  • Turn the printer on. Your print will start after about 5 minutes.
  • After the print is over, wait for the temperature to cool down and carefully remove the 3D printed object from the build plate.
  • Clean the build plate.

Printing from the computer:

  • Open MatterControl and drag your .stl file into the QUEUE section of the application.
  • On the top-left section, click on “Select Printer.” Select “Robo 3D TM Turing” in the window that pops out.
  • Under "Settings" ensure that the correct material is selected.
  • Under "Controls" an offset of 0.9 typically shows the best results.
  • Pre-heat the extruder and bed on the same page.
  • Alternatively, near the top center of the screen, an extruder temperature and a bed temperature will be shown, mouse over and click "pre-heat" for both.
  • Prep the build plate using one the following:
    • Glue Stick
    • Vinyl Sheeting
    • Hairspray
  • Click print once the printer has heated up.
  • After the print is over, wait for the temperature to cool down and carefully remove the 3D printed object from the build plate.
  • Clean the build plate.

Taz Lulzbot 3D Printer

Software for the printer: Cura

Steps to follow in order to print:

  • Insert a microSD card into the Mac.
  • Open Cura and press “Load Model” to upload the stl file you want to print.
  • Right click “Control” and select the “Save gcode” and then choose the SDcard under the “Devices” panel.
  • Make sure the Taz 3D Printer is turned on.
  • Safely eject the sdCard from the Mac and insert it into Taz Printer (on left side of the LCD screen)
    • Make sure the SD card has the pins facing towards you when insert it
  • Back on the LCD screen, rotate the knob counter-clockwise to decrease the print speed to ~50%
  • Press the knob, scroll down by rotating the knob clockwise and select “Temperature”.
  • Select “Custom Temp” and set the "Nozzle" to 240 and "Bed" to 64
  • After a few seconds, the LCD will display the info screen again and the printer will start heating up. Wait until the temperatures reach 240C and 64C.
  • In the info screen, press the knob again. Scroll down and select “Print from SD” Select your file and it will start printing right away.
  • Once the printing has finished, wait for the bed to cool down and carefully remove the 3D printed object.

MakerBot 3D Printer

Software for the printer: ReplicatorG

Steps to follow in order to print:

  • Insert a microSD card into the Mac.
  • Open ReplicatorG, drag and drop your stl file into application screen.
  • Adjust your model if you need to.
  • Select “Generate GCode” on the bottom right.
  • Make sure the values are set as shown in the image below and then select “Generate GCode”
Replicator values.png
  • If prompted with an “Acceleration Warning” select “OK”
  • Wait until it generates the gcode.
  • After the file is generated go to the gcode tab and modify the numbers on the lines M104 should be 230 and M109 should be 128, i.e.:
M104 S230 T1 (set extruder temperature) M109 S128 T1 (set HBP temperature)
Make sure to save it by pressing “Command + S”.
  • Select “Build to file using SD Card” as shown in the image below. Select the microSD card and make sure to save it as “.x3g” format.
Build from sd.png
  • Wait until it is done building and then safely eject the sdCard from the Mac and insert it into the MakerBot. Note: You can find the sdCard slot as shown in the image below:
MakerBot-slot.jpg
  • Turn on the printer.
  • Select “Build from SD” and then using the arrows scroll down to your file.
  • The printer will start heating up and once it finishes heating up, it will start printing.
  • Once the printing has finished, wait for the bed to cool down and carefully remove the 3D printed object.