Difference between revisions of "Galileo"
(→Installation) |
(→Installation) |
||
| Line 69: | Line 69: | ||
=Installation= | =Installation= | ||
| − | + | You're impossible to please. Read the documentation from [[https://communities.intel.com/servlet/JiveServlet/previewBody/22204-102-1-25429/Galileo_GettingStarted_329685_005.pdf Intel]] or [[https://learn.sparkfun.com/tutorials/galileo-getting-started-guide Sparkfun]]. | |
| − | |||
| − | |||
| − | |||
| − | |||
| − | |||
| − | |||
| − | |||
| − | |||
| − | |||
| − | |||
| − | |||
| − | |||
| − | |||
| − | |||
| − | |||
| − | |||
| − | |||
| − | |||
| − | |||
| − | |||
| − | |||
| − | |||
| − | |||
| − | |||
| − | |||
| − | |||
| − | |||
| − | |||
| − | |||
| − | |||
| − | |||
| − | |||
| − | |||
| − | |||
| − | |||
| − | |||
| − | |||
| − | |||
| − | |||
| − | |||
| − | |||
| − | |||
| − | |||
| − | |||
| − | |||
| − | |||
| − | |||
| − | |||
| − | |||
| − | |||
| − | |||
| − | |||
| − | |||
| − | |||
| − | |||
=Disasters= | =Disasters= | ||
Revision as of 16:26, 22 March 2014
The Galileo is a fusion of a Linux PC running Intel's architecture and an Arduino. The purpose is to provide the benefits of a pc (connectivity, power, storage, ports) with the benefits of an Arduino (an open-platform hardware interface.)
This page specifically discusses the Galileo. Anything Arduino-specific should get relegated to here.
Contents
Notes
NOTES!
Photos
Design Philosophy
- Change one thing at a time.
- Check if it works after every change.
- When success has been reached, repeat it: do it again.
- When success has been repeated, replicate it: have others do it.
Failure List
Having problems?
- Are you using Galileo's arduino ide?
- Are you using the right pin number? Is it analog or digital?
- Is your pin mode set correctly?
- Is the ground and power connected correctly?
- order is power, ground, and then input/output
- Do you have pin terminators on all power columns?
- If too many sensors are connected, you might run out of power. Try reducing the number of sensors.
- Talk to scientists.
- Research if your sensor needs a resistor. (330m or 10k)
- If nothing else works, try a different breadboard or a different arduino or replacement sensors.
- If still having trouble, ask Ben.
Info Dump
IoTkit handles ethernet transactions. It connects to a host and sends a packet with [string, val] where val is the value you wish to send. You can save information locally and push it to a server later. A watch battery can be used to preserve machine state between power-on's. [validate]
There are no packages installed on Intel's Linux distro.
There's an interface for C++ that lets you access the Arduino.
Always connect the power first.
When flashing the firmware, YOU MUST HAVE THE POWER CONNECTED. Otherwise you risk bricking the board.
There are example sketches for every sensor included in Intel's sensor kit. Where? Good question.
Costs $60+ as of 2/5/14. Purchase is currently cheapest at [Micro Center] and [Amazon].
Resources
[FAQ] (useful)
[Release Notes] (supported software/hardware and bugs)
Downloads
[Drivers]
Installation
You're impossible to please. Read the documentation from [Intel] or [Sparkfun].
Disasters
These are notes and observations after research.
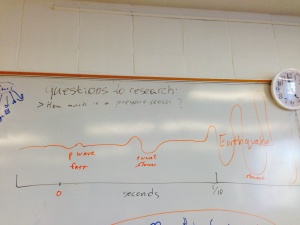
Earthquake
- occur due to movement in tectonic plates
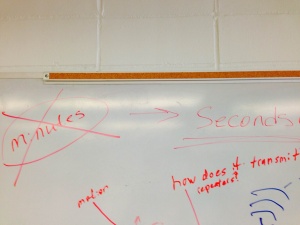
- only seconds of notice, 5-10 seconds
- [p waves] are much faster than [s waves] and the actual waves that cause the earthquake.
- earthquakes travel at about the same speed as data networks
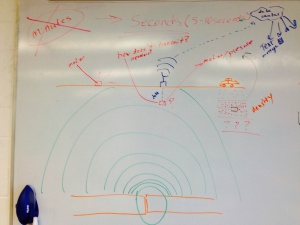
- can be measured by motion (on surface or underground) and pressure (underground)
- downside of underground monitoring is 1) power and 2) transmission
- can use repeaters or solar power to solve these issues
- advantage of being underground is distance from noise (such as animals and humans) and being closer to the source of the earthquake
- being attached to or submersed in denser materials is good (?)
- downside of underground monitoring is 1) power and 2) transmission
Resources
Tsunami
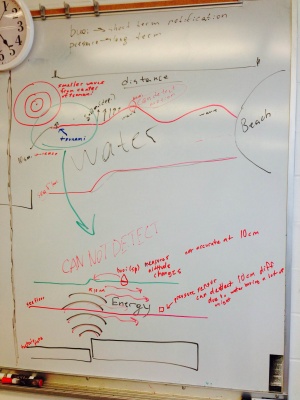
- in the deep sea pressure sensors are used to measure the relatively small sea-level change (in centimeters)
- nearer to shore, where waves start to form, altitude could be measured by buoy
- travel at hundreds of miles per hour
- tsunami headquarters in Hawaii
- notification could be minutes to hours in advance depending on distance from source of tsunami
- height/speed of wave reduces with distance
Code
// include directives
- include <string>
using namespace std;
// pin declarations
const int pin_horizontalY = 5;
const int pin_vertical = 6;
const int pin_horizontalX = 7;
const int pin_temp = A0;
const int pin_flame = A0;
const int pin_magnet = 4;
const int pin_magnet_digital = 0;
// delay on loop
const int delay_time = 100;
// sensors
float temp;
int magnet;
int magnet_digital;
int flame;
// tilt sensors
int vertical;
int v_last;
int horizontalX;
int hX_last;
int horizontalY;
int hY_last;
int c = 0; // count of occurred changes
// intializing pin modes
// currently ignored for whatever reason
void setup() {
 Serial.begin(9600);
 pinMode(pin_temp, INPUT);
 //pinMode(pin_magnet, INPUT);
 pinMode(pin_vertical, INPUT);
 pinMode(pin_horizontalX, INPUT);
 pinMode(pin_horizontalY, INPUT);
}
void loop() {
 readTemp();
 readVertical();
 readHorizontalX();
 readHorizontalY();
 //readMagnet();
 output();

 delay(delay_time);
}
void readFlame() {
 flame = analogRead(pin_flame);
 float f = flame * (5.0 / 1023.0);
 Serial.print("flame ");
 Serial.print(flame);
}
void readTemp() {
 temp = analogRead(pin_temp);
 temp = (temp * 500) / 1024.0;
 temp = ((temp*9)/5) + 32;
 temp = temp / 10.0;
 Serial.print(" temp ");
 Serial.print(temp);
}
void readMagnet() {
 magnet = analogRead(pin_magnet);
 //magnet -= 460;
 Serial.print("magnet ");
 Serial.print(magnet);
}
void readVertical() {
 vertical = digitalRead(pin_vertical);
 //Serial.println(vertical);

 if(vertical != v_last) {
   v_last = vertical;
   c++;

   Serial.print(" Z ");
   Serial.print(c);
 }
}
void readHorizontalX() {
 horizontalX = digitalRead(pin_horizontalX);
 //Serial.println(horizontalX);

 if(horizontalX != hX_last) {//(horizontalX != hX_last) {
   Serial.print(" X ");
   hX_last = horizontalX;

   c++;
   Serial.print(c);
 }
}
void readHorizontalY() {
 horizontalY = digitalRead(pin_horizontalY);
 //Serial.println(horizontalY);

 if(horizontalY != hY_last) {
   Serial.print(" Y ");
   hY_last = horizontalY;

   c++;
   Serial.print(c);
 }
}
// trying to automate logging
// want to set it as a global flag
// string isn't working currently
void print() {//string id) {
   c++;
   Serial.print(c);
   Serial.print(" ");
   //Serial.print(id);
   Serial.println();
}
void output() {
 //Serial.print("X: " + horizontalX);
 Serial.println();
}
Specs
- 400mhz cpu
- 256mb ram
- 32gb micro sd
- 10/100 ethernet
- PCI Express mini-card with PCIe 2.0
- USB host and device
- 5v/3.3v power
- same Arduino pin layout
